This article shows a number of different ways to set a prototype in Tinderbox version 6+.
This document was last revised using Tinderbox v7.5.4 on macOS 10.13.6.
Author: Mark Anderson (a Tinderbox user since 2004).
1. General notes
In all the examples below, the user is trying to set a note to use the built-in prototype 'Person' which has already been added to the current TBX document.
In all the methods, if more than one object is selected, the resulting prototype is applied to all items in the selection - this allows the setting of a prototype for multiple notes at the same time.
When using the pop-up lists, selecting 'none' both removes the current prototype assignment and restores inheritance of $Prototype in the selected item(s).
When selecting $Prototype in the Inspector or Get Info, be aware that it is found in the 'General' group of System attributes.

2. Main view: Map
2.1 Select note
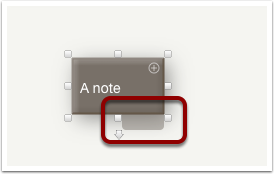
Whenever a note (or container, agent or adornment) is selected, a little tab is shown in the bottom right corner. If a prototype is set, this will show the prototype's title, otherwise it is blank as seen here.
2.2 Open Pop-up

Click on the little tab (left and right click both work) and a pop-up list is shown of all prototypes in the current Tinderbox document. Click the desired prototype's name to set that as the prototype for the current selection.
3. Main view: Outline
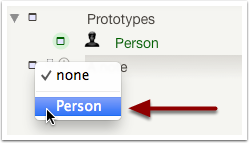
Right-click the rectangular icon at the very left of the current item's line in the outline. Click the desired prototype name to set it as the note's prototype.
4. Main view: Chart

As with the Outline, right-click the rectangular icon at the very left of the current item's line in the chart. Click the desired prototype name to set it as the note's prototype.
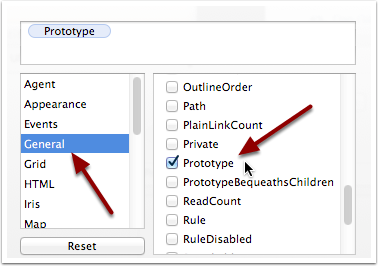
5. Main view: Get Info

Open Get Info. Select attributes -> General -> Prototype. Click in the value box and type Person. Once you've applied that value to at least one note you can also use the pop-up value list (triangle at right of box) and select 'Person' from the list of pre-applied values.
Pro Tip: if you want to remove the existing prototype and restore inheritance, right-click in the title or value box (when not in value edit mode) and click 'Use Inherited Value' from the pop-up menu.
6. Text view: Key Attribute
6.1 Adding $Prototype
First add the System attribute $Prototype as a key attribute for the current note (if not already shown!).
6.2 Setting $Prototype
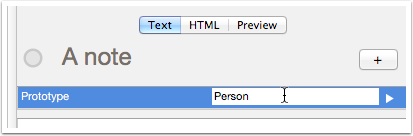
Click in the value box for $Prototype and type Person and use the Return key to complete the edit. Once you've applied that value to at least one note you can also use the pop-up value list (triangle at right of box) and select 'Person' from the list of pre-applied values.
Pro Tip: if you want to remove the existing prototype and restore inheritance, right-click in the title or value box (when not in value edit mode) and click 'Use Inherited Value' from the pop-up menu.
7. Inspector - Properties Inspector - Prototype tab
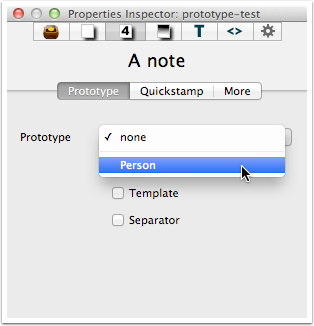
Open the Properties Inspector, and select the Prototype tab if needed. Open the Prototype pop-up list and select 'Person'. Selecting 'none' here, returns $Prototype to default state.
8. Inspector - Properties Inspector - Quickstamp tab

This is listed for completeness - if using the Inspector, use the Prototype tab instead.
Select the General group from the top pop-up and Prototype from the bottom pop-up. Type Person and click the Apply button.
9. Action code - Action Inspector: $OnAdd or $AgentAction
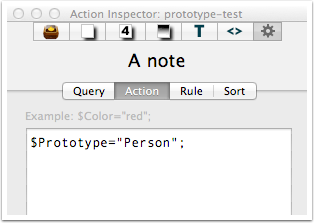
The Action tab of the Action Inspector can be used to set $OnAdd (for notes/adornments) or $AgentAction (for agents). Enter the code:
$Prototype="Person";
Press the Return key to finish the edit - the code is now live. Beware:
- 'Person' must be in quotes. Double-quotes are the norm though single quotes are allowed.
- The closing semi-colon is needed only if further action code expressions will be added to the same expression (i.e. code in the same box)
10. Action code - Document Inspector: Stamps
10.1 Adding A Stamp
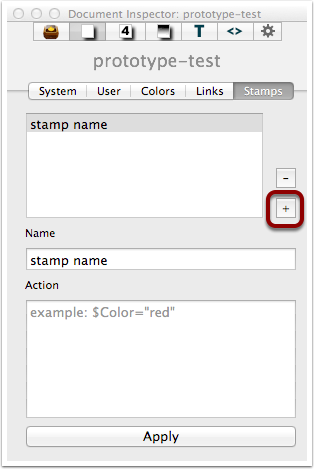
Click the '+' button to add a new stamp.
10.2 Naming The Stamp
Type a title for the stamp in the Name box. Click the Return key to save the name and add it to the list in the top box.
10.3 Adding Action Code

In the Action box, enter the code:
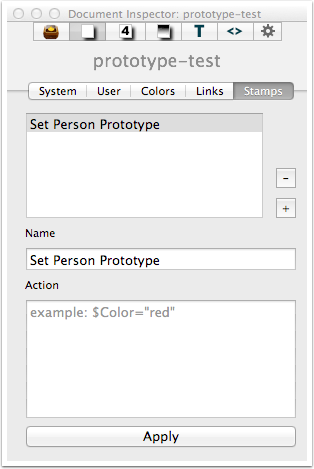
$Prototype="Person";
Press the Return key to finish the edit - the stamp is now ready for use. Beware:
- 'Person' must be in quotes. Double-quotes are the norm though single quotes are allowed.
- The closing semi-colon is needed only if further action code expressions will be added to the same expression (i.e. code in the same box)
11. Action code - Using Stamps

Having made a stamp (steps above) there are two ways to use it. First select the note(s) to be altered by the code. Then either:
- Use the Apply button at the bottom on the Stamps pane of the Document Inspector (see the last step above).
- Use the Stamps menu from the main menu bar and select the desired stamp (shown above).
To make a stamp to clear any $Prototype setting use: $Prototype=; - in this case the semi-colon is necessary.
12. Action code - offset reference

To set the prototype of 'A note' from another note, in this case in the $Rule of note 'Another note", use this code:
$Prototype("A note")="Person";
This tells the current note the set the prototype of a different, named, note.
13. Remember: In Tinderbox there is usually more than one method to do somthing
This article shows that as so often in Tinderbox there is more than one way to achieve a task and no one 'right' way. Different methods will suit different workflows. It also demonstrates how many features are stored as attributes. Thus for any note, its System attribute $Prototype holds a value which is the name of the note's prototype (if it has one).
Don't feel obliged to use all the methods described here. Find and use those that suit your data and style of work.